I got a student asking me about, how he could switch on/off a sample e.g. beeing apllied to his “CLOSED” field/pad of his kick drum, so that he could switch this sample on in the chorus and switch it off in the verse. The set-up is only SP, one sensor, no other external midi hardware.
I had a little thought and came up with the idea the use one field/pad from the same sensor, e.g. “SHELL” and set up a velocity control assignment, set it to button and to “toggle” and assign this to the “MUTE” of this track. (“VOLUME” of the sampler would work as well"). Of course he could use the kit selectors as well with applying two fields/pads to “scroll left/right”. My question is: Do you have any other ideas/concepts in mind for solving this?
Cheers Tobi
Do give you the full picture, here are the instructions I sent him to set this up, as it might be useful to others here:
So let’s pick the “SHELL” field/pad from your SP sensor which is beeing attached to your kick drum. (Try “rim tip” or “rim shell” here as well, as you might get better results depending on your kick drum and SP presets)
1.You need to train and have the “SHELL” field/pad beeing switched on (even if you are not using this for triggering sounds)
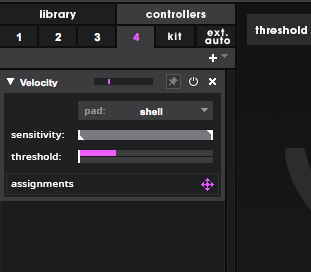
2.You need to create a “VELOCITY CONTROLLER” on the dedicated track/drum and pick under the “PAD:” menu “SHELL” (if you are not sure how to do this check the video Module 2 - 207):
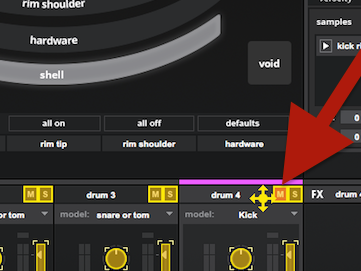
3.You now need to assign this controller to the “M” button (“MUTE”) of the track for your kick field/pad
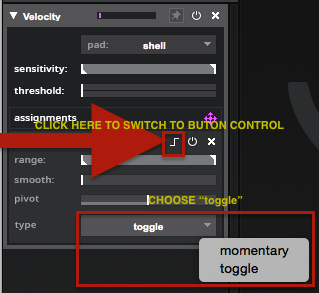
4.Now you need to make some changes here to the “CONTROL ASSIGNMENT”
4.1 - You need to switch the control from continous to button control
4.2 - when you have switched to button control, you will get the parameter “PIVOT” and a menu where you can switch between “momentary” and “toggle” - choose “toogle”
You are now able to control the “MUTE” by hitting the “SHELL”
5.You now want to select the right “PIVOT” value, meaning at which value (=velocity) the control-assignment should react to. If the “PIVOT” is high, this would mean, you have to hit quite hard/loud, if the “PIVOT” is at a (too) low value, you might get problems with cross-talk from other pads/fields (depends on your accuracy in “training”)
This is one solution, you could ‘control-assign’ this to the “VOLUME” of the SAMPLER as well, so you don’t mute the whole sensor/track OR you could use two field/pads, ‘control-assign’ them to the kit selector and you can switch through 20 kit presets. As mentioned before, this is a great opportunity, if you have multiple songs in one set, where you will need different kits.