Does anyone know how to start and stop a loop, for example with a tom?
I imported a WAV file that I can play but cannot stop. The file stops by itself when it has finished playing.
Hi @swissdrummer,
Yes. There at least two ways to accomplish this. Both methods involve turning on the loop parameter of the sampler. Below I have attached a .sp2 with both methods, so you can drag&drop/copy&paste either one into your working sets.
Also, at the bottom of this post is a screen recording of clicking through the modules used to set this up.
Click to download the .sp2 to drag/drop into your sets: start-stop-loop-ideas.sp2 (5.7 KB)
And here is a text explanation of both methods:
Method 1 - Use the same hit message (zone, drum, midi note, etc) to start/stop the loop.
If, for example, you’re using a tom to start/stop the loop, this means that the first time you hit the tom it will start the loop, and then the next time you hit the tom it will stop the loop.
Using this method you’ll need:
- A sequencer with two steps (set to retrig)
- The first step should include your loop
- The second step should be blank
- (optional) a velocity curve set so that the loop doesn’t trigger with low velocity hits, and always plays the same volume when it is triggered.
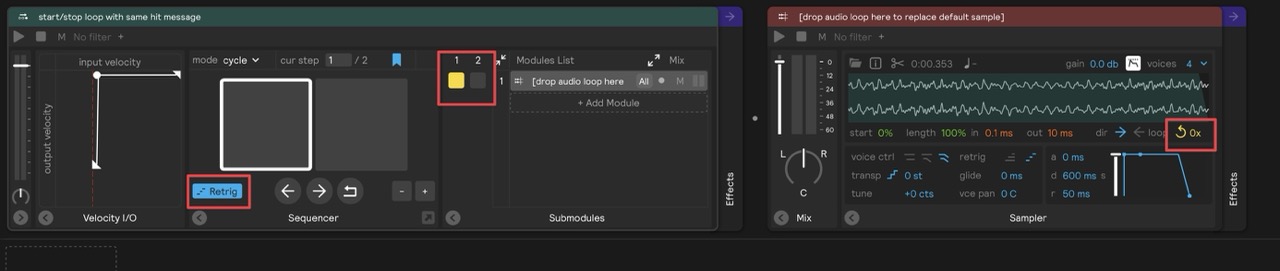
In the video at the bottom of this post, I demonstrate that the first time clicking the play button starts the loop, and then clicking it the second time stops the loop.
Then I use the “group into” right click option to group the modules into a Tom Drum Pad and map them to the center pad. I then click the center of Tom virtual instrument repeatedly to start/stop the loop.
Then repeatedly click the rim of Tom virtual instrument to demonstrate that nothing happens (since the looping modules are mapped to the center).
Method 2 - start/stop loop with two trigger macro assignments
Using this method you’ll need:
- The looping sampler inside a sequencer but not assigned to any steps. This blocks all hit messages to the sampler, ensuring that you can play the drums and not trigger the sampler (that part comes later)
- Two trigger macros, one assigned to the looping sampler’s
playbutton and the other assigned to the looping sampler’sstopbutton. - (optional) adjust
play/stopbutton assignments’ velocity sensitivity so that quiet hits don’t trigger either assignment. You can also further adjust theplaybutton’s sensitivity to only play back at the highest level.
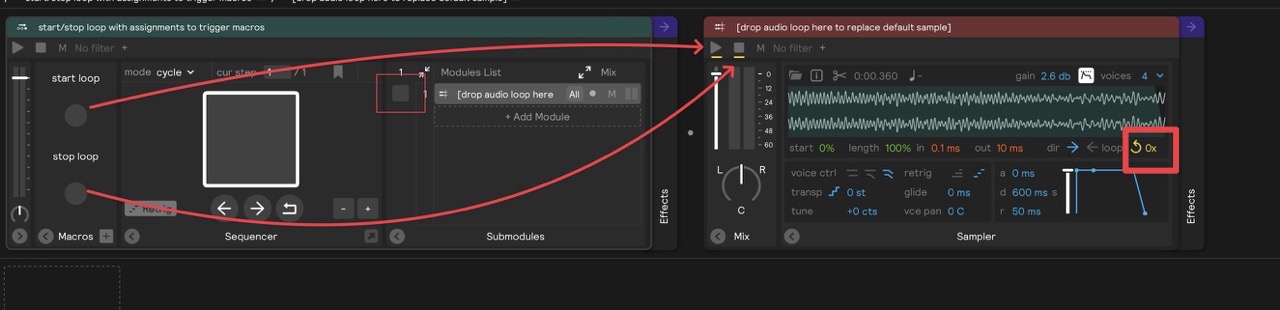
The video at the bottom of this post shows that I assign the snare drum to start the loop, and the tom to stop the loop.
1 Like
Hello, thank you very much. You are my hero. You have helped me so many times and so quickly. Without your help, I would probably have sent the device back long ago.
1 Like
You’re welcome! Always glad to help ![]()